Turn Offline
Orders ON!
Install Portalink™AnyOrder and start testing
It’s quick, easy and free-of-charge.


Offline Order Digital Transformation
Step X Step Guide: Install → Test → Optimize
Step 1
Install the App
Setup
1
Search for the App in the Shopify app store: https://apps.shopify.com/portalink-anyorder2
Click Install in the App Store listing.3
In your Shopify admin page, click Install .4
Select POC, click Confirm.5
Choose the payment method, then click Approve.6
Click Complete Setup.7
Navigate through the Getting Started page for initial instructions.
Helpful hint:
Install the App free-of-charge within minutes to start your testing process. If you like Shopify X Portalink as much as we think you will, we can work through a full implementation strategy.
Step 2
Email Blacklisting
Setup
Add unwanted domains to your blacklist (e.g. your own domain):
1
Click Admin on the Portalink™AnyOrder App.2
Click Emails Configuration.3
Add unwanted email or domain addresses.4
Set the blacklist type.5
Click Add.
Helpful hint:
You may prefer to manually forward email orders for testing before setting up auto-forwarding, in which case we recommend you only blacklist your own domain during the POC phase. This will prevent you linking your own email address to an account by mistake.
Step 3
User Roles & Permissions
Setup
Granting access to the Portalink™AnyOrder App:1
Click Settings within your Shopify Admin Platform.2
Click Users and Permissions.3
Click Add Staff. (only required if not an existing User within Shopify Admin).4
Enter the details of each new User.5
Assign Store and/or App and/or sales permissions for new and existing Users by ticking the appropriate boxes. Click Save.6
Click Send invite (new Users only).
Set-up User Permissions for Portalink™AnyOrder App:1
Open Portalink™AnyOrder.2
Click Admin.3
Under User Permissions, click on Manage Users.4
Click the + Add Role button to add roles to a user.5
To remove, click on the minus button next to the role.
Helpful hint:
Assign your Partner with SI Partner User Role permissions to provide access to Analytics and Admin, enabling them to help you accelerate your Offline Order Transformation.Step 4
Email Forwarding
Setup
Find the recipient email address:1
Click Admin.2
Click Get Started.3
Use the email address provided to manually or auto-forward emails, with order attachments, to your Shopify X Portalink Inbox.
Option 1: Quick Test1
Select any orders that have been emailed to you.2
Forward email to the email address provided in Admin.3
Portalink will search the body of the forwarded email for the customer email address, and will ask you to select and link the correct address to the customer account, company, location and customer detail. The system will ask you to click the map order button (refer to Step 5).
Option 2: End-to-End Testing1
Real-time Auto-forwarding of email orders can be setup for one or many customer accounts when ready.2
Auto-Archive a copy of every email forwarded to Portalink.
Helpful hint:
We recommend you start by manually forwarding emails during the POC phase. If you’re ready to proceed to auto-forwarding, conduct a Google search on how to set up the email forwarding rules for the specific email provider (Gmail, Outlook.com, Yahoo Mail, etc.), or consult your email administrator.
Step 5
Inbox & Customer Linking
Setup
The Inbox is where all Messages, including Orders, can be viewed. Portalink™AnyOrder filters messages to the best of its ability in six categories:
1
Linking Required: Messages that may include a first-time order from a customer that needs to be linked and mapped.2
Mappings Verification: Messages that are awaiting verification3
Pending: Messages that have been linked and awaiting mapping4
All Messages: (excludes those that have already been processed and/or archived)5
Processing: Orders that are being processed and validated6
Archived.
For Testing:1
Send a Test email.2
Click on Inbox to view.
Linking email/order to a company account:1
Open the order in the Inbox.2
Select the correct email address under Link Account (optionally check "Only use domain name" and "Remember for future messages").3
Choose the company to link.4
Click Link Company, then Confirm Link.5
Click Request Mapping.
Helpful hint:
It is important to check the Inbox daily to ensure that communications from your customers are being quickly dealt with and to stay on top of linking and mapping.
Best practice is to assign this task to individual/s.
Step 6
Mapping
Test
Mapping and verifying order data in the Inbox Page (after Request Mapping):
1
Click Verify – Portalink AI will generate the first mapping in seconds.2
Check each field that has been mapped to ensure it aligns with the Order fields.3
Click OK if the data is correct.
If the mapping is incorrect or missing field/s:1
Click Wrong → Fix, then select from options OR manually enter or copy/paste the order data to direct Portalink AI to the correct field location.2
Navigate through steps using Next/Previous buttons.3
Once all data is verified, click Submit Mapping Verification.4
Click Retry to process the order.
Helpful hint:
A few minutes mapping a customer’s order form will save hours over time.
Customer Order templates will change from time to time. If this occurs, Portalink AI will automatically re-map the order and ask you to re-verify the new mapping.
Step 7
Order Processing
Test
Pre-filtered Order Tabs include:1
All Orders – excludes orders that have already been processed and exported to Shopify Drafts.2
Pending Orders – WIP and new orders that have passed validation but are yet to be exported to Shopify Drafts.3
Archived Orders – All Orders that have been exported to Shopify Drafts.4
Needs Attention – Orders that fail validation e.g. Price does not match.5
The Orders Page will default to Pending Orders.
Processing Orders1
Click on Orders and choose the preferred tab.2
Open an Order – you will see the email message.3
Click on attachment to view the Order.4
Portalink will alert you at the top of page if action is needed.5
Follow the directions to fix any data discrepancies.6
When all errors are resolved, click on Export to Draft.
NOTE: Portalink POC fee applies for every order that is exported to Shopify Drafts. For testing purposes, we recommend that you only click Export to Draft when you want to test from End-to-End.
Helpful hint:
Portalink™AnyOrder is designed to help you achieve optimal Zero-Touch, however customer data discrepancies are inevitable due to the hundreds or thousands of different systems being used and maintained by your customers. Portalink will auto-detect data discrepancies and direct your Customer Service Agents to quickly fix each error with minimal time wasted.
Step 8
Suggested Test Cases
Test
A. Order Sample with no errors:
1
Find a recently emailed order with multiple order lines that are 100% correct*. Forward the email to the Email Forwarding Address provided - see Step 4.2
Go to Inbox - link account and (1) Request Mapping (2) Verify mapping (3) Retry.3
Click on the Orderslink in the side menu and click on order to open.4
Click on the order attachment icon to view order.5
Export to Draft or Archive.
B. Order Sample with errors:1
Find a recently emailed order with multiple order lines that contain one or more data errors*.Example: Order errors could include incorrect pricing; and/or incorrect material number.2
Forward the email to the Email Forwarding Address provided - see Step 4.3
Go to Inbox → (1) Link Account (2) Request Mapping (3) Verify mapping (4) Retry.4
Click on the Orders link in the side menu and click on order to open.5
Click on the order attachment icon to view order.6
Follow the directions to fix any data discrepancies.7
When all errors are resolved, Export to Draft or Archive.
*Suggestion for all Test Orders: Select orders that have been recently received by email from customers that already exists in your Shopify platform and check that the products ordered are already included in your online catalog.
Helpful hint:
Set up email forwarding rules for one or more of your biggest customers to test new orders as they arrive in real time. We suggest you continue manually processing these orders with your current (manual) process until the system has been fully implemented with the help of your SI Partner.
Step 9
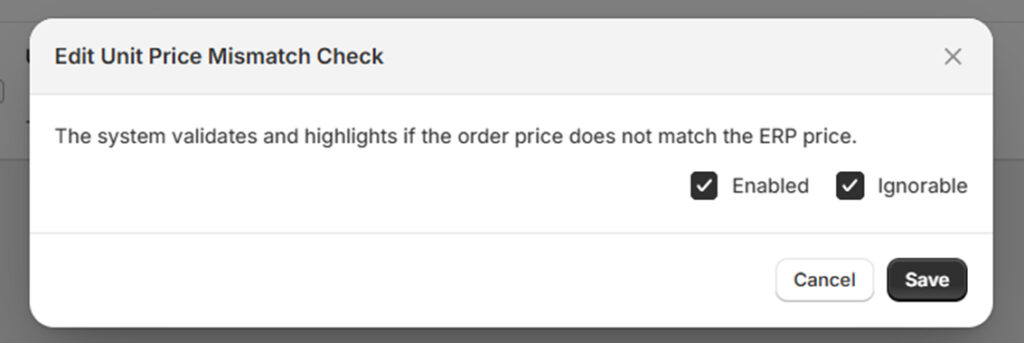
Business Rules
Optimize
Business Rules are pre-configured for testing purposes. Your SI Partner can assist you to review and modify all Business Rules using the following steps:
1
Click Admin, and then click Business Rules.2
Click Add filter + to filter the business rules.3
To remove a filter, just click on the x button next to it.
Changing Business Rules:
1
Tick the checkbox next to the Business Rule.2
Click Toggle Enable and choose between Ignorable → ON or Not Ignorable → OFF.
Modifying fields in Advanced Configuration:
1
Click the gear icon under Validate Order Data field values.2
Set the minimum and maximum lengths and values for the data fields.
Helpful hint:
Your SI Partner can help you scope and
configure the Business Rules to match
your current order processing rules and
workflows prior to Go-Live.Your SI Partner will also identify any data
or integration gaps that need to be
addressed to achieve best outcomes.
Install the App
Setup
1
Search for the App in the Shopify app store: https://apps.shopify.com/portalink-anyorder2
Click Install in the App Store listing.3
In your Shopify admin page, click Install .4
Select POC, click Confirm.5
Choose the payment method, then click Approve.6
Click Complete Setup.7
Navigate through the Getting Started page for initial instructions.
Helpful hint:
Install the App free-of-charge within minutes to start your testing process. If you like Shopify X Portalink as much as we think you will, we can work through a full implementation strategy.
Email Blacklisting
Setup
Add unwanted domains to your blacklist (e.g. your own domain):
1
Click Admin on the Portalink™AnyOrder App.2
Click Emails Configuration.3
Add unwanted email or domain addresses.4
Set the blacklist type.5
Click Add.
Helpful hint:
You may prefer to manually forward email orders for testing before setting up auto-forwarding, in which case we recommend you only blacklist your own domain during the POC phase. This will prevent you linking your own email address to an account by mistake.
User Roles & Permissions
Setup
1
Click Settings within your Shopify Admin Platform.2
Click Users and Permissions.3
Click Add Staff. (only required if not an existing User within Shopify Admin).4
Enter the details of each new User.5
Assign Store and/or App and/or sales permissions for new and existing Users by ticking the appropriate boxes. Click Save.6
Click Send invite (new Users only).
1
Open Portalink™AnyOrder.2
Click Admin.3
Under User Permissions, click on Manage Users.4
Click the + Add Role button to add roles to a user.5
To remove, click on the minus button next to the role.
Helpful hint:
Email Forwarding
Setup
1
Click Admin.2
Click Get Started.3
Use the email address provided to manually or auto-forward emails, with order attachments, to your Shopify X Portalink Inbox.
1
Select any orders that have been emailed to you.2
Forward email to the email address provided in Admin.3
Portalink will search the body of the forwarded email for the customer email address, and will ask you to select and link the correct address to the customer account, company, location and customer detail. The system will ask you to click the map order button (refer to Step 5).
1
Real-time Auto-forwarding of email orders can be setup for one or many customer accounts when ready.2
Auto-Archive a copy of every email forwarded to Portalink.
Helpful hint:
We recommend you start by manually forwarding emails during the POC phase. If you’re ready to proceed to auto-forwarding, conduct a Google search on how to set up the email forwarding rules for the specific email provider (Gmail, Outlook.com, Yahoo Mail, etc.), or consult your email administrator.
Inbox & Customer Linking
Setup
The Inbox is where all Messages, including Orders, can be viewed. Portalink™AnyOrder filters messages to the best of its ability in six categories:
1
Linking Required: Messages that may include a first-time order from a customer that needs to be linked and mapped.2
Mappings Verification: Messages that are awaiting verification3
Pending: Messages that have been linked and awaiting mapping4
All Messages: (excludes those that have already been processed and/or archived)5
Processing: Orders that are being processed and validated6
Archived.
1
Send a Test email.2
Click on Inbox to view.
1
Open the order in the Inbox.2
Select the correct email address under Link Account (optionally check "Only use domain name" and "Remember for future messages").3
Choose the company to link.4
Click Link Company, then Confirm Link.5
Click Request Mapping.
Helpful hint:
It is important to check the Inbox daily to ensure that communications from your customers are being quickly dealt with and to stay on top of linking and mapping.
Best practice is to assign this task to individual/s.
Mapping
Test
Mapping and verifying order data in the Inbox Page (after Request Mapping):
1
Click Verify – Portalink AI will generate the first mapping in seconds.2
Check each field that has been mapped to ensure it aligns with the Order fields.3
Click OK if the data is correct.
1
Click Wrong → Fix, then select from options OR manually enter or copy/paste the order data to direct Portalink AI to the correct field location.2
Navigate through steps using Next/Previous buttons.3
Once all data is verified, click Submit Mapping Verification.4
Click Retry to process the order.
Helpful hint:
A few minutes mapping a customer’s order form will save hours over time.
Customer Order templates will change from time to time. If this occurs, Portalink AI will automatically re-map the order and ask you to re-verify the new mapping.
Order Processing
Test
1
All Orders – excludes orders that have already been processed and exported to Shopify Drafts.2
Pending Orders – WIP and new orders that have passed validation but are yet to be exported to Shopify Drafts.3
Archived Orders – All Orders that have been exported to Shopify Drafts.4
Needs Attention – Orders that fail validation e.g. Price does not match.5
The Orders Page will default to Pending Orders.
1
Click on Orders and choose the preferred tab.2
Open an Order – you will see the email message.3
Click on attachment to view the Order.4
Portalink will alert you at the top of page if action is needed.5
Follow the directions to fix any data discrepancies.6
When all errors are resolved, click on Export to Draft.
NOTE: Portalink POC fee applies for every order that is exported to Shopify Drafts. For testing purposes, we recommend that you only click Export to Draft when you want to test from End-to-End.
Helpful hint:
Portalink™AnyOrder is designed to help you achieve optimal Zero-Touch, however customer data discrepancies are inevitable due to the hundreds or thousands of different systems being used and maintained by your customers. Portalink will auto-detect data discrepancies and direct your Customer Service Agents to quickly fix each error with minimal time wasted.
Suggested Test Cases
Test
A. Order Sample with no errors:
1
Find a recently emailed order with multiple order lines that are 100% correct*. Forward the email to the Email Forwarding Address provided - see Step 4.2
Go to Inbox - link account and (1) Request Mapping (2) Verify mapping (3) Retry.3
Click on the Orderslink in the side menu and click on order to open.4
Click on the order attachment icon to view order.5
Export to Draft or Archive.
1
Find a recently emailed order with multiple order lines that contain one or more data errors*.Example: Order errors could include incorrect pricing; and/or incorrect material number.2
Forward the email to the Email Forwarding Address provided - see Step 4.3
Go to Inbox → (1) Link Account (2) Request Mapping (3) Verify mapping (4) Retry.4
Click on the Orders link in the side menu and click on order to open.5
Click on the order attachment icon to view order.6
Follow the directions to fix any data discrepancies.7
When all errors are resolved, Export to Draft or Archive.
*Suggestion for all Test Orders: Select orders that have been recently received by email from customers that already exists in your Shopify platform and check that the products ordered are already included in your online catalog.
Helpful hint:
Set up email forwarding rules for one or more of your biggest customers to test new orders as they arrive in real time. We suggest you continue manually processing these orders with your current (manual) process until the system has been fully implemented with the help of your SI Partner.
Business Rules
Optimize
Business Rules are pre-configured for testing purposes. Your SI Partner can assist you to review and modify all Business Rules using the following steps:
1
Click Admin, and then click Business Rules.2
Click Add filter + to filter the business rules.3
To remove a filter, just click on the x button next to it.
Changing Business Rules:
1
Tick the checkbox next to the Business Rule.2
Click Toggle Enable and choose between Ignorable → ON or Not Ignorable → OFF.
Modifying fields in Advanced Configuration:
1
Click the gear icon under Validate Order Data field values.2
Set the minimum and maximum lengths and values for the data fields.
Helpful hint:
Your SI Partner can help you scope and
configure the Business Rules to match
your current order processing rules and
workflows prior to Go-Live.
Your SI Partner will also identify any data
or integration gaps that need to be
addressed to achieve best outcomes.

There's never been a better time to eliminate costly manual data entry
For more information
Complete the form or contact us:
North America: NAsales@portalink.com
South America: SAsales@portalink.com
Europe: EMEAsales@portalink.com
Asia Pacific: APACsales@portalink.com